
This is my first tutorial! Hurray!! I hope you find it helpful! It will be a very heavy picture tutorial and I made sort of a mistake; but have decided to post it anyway. There is a nice way to make a pocket to receive the other end of your binding when finished but I cut the strips the wrong way but it still works just fine! So, here we go!!
2" CROSS GRAIN MITERED BINDING (1/4" Finished Binding)
 1. Lay out finished quilt top.
2. Measure around quilt on all four sides. Close to the raw edge.
3. Take this measurement and add 12" for mitered corners.
4. Divide by 42", which is the standard width of fabrics.
5. Round the number to the nearest 10.
 6. For this quilt, I needed 7 strips.
 7. Stack the strips on top of each other as neatly as possible.
 Just so you have a visual of where the other sides are!
 8. Cut the ends of the strips at a 45* angle. This is where you can say that I made a mistake. You can cut the opposite way to result in a pocket that you can see. I did not want to start over so kept going and it was fine. You will see towards the end of this tutorial.
 Another visual for you to see how it is cut.
 9. Cut the other ends of the strips the same way. Now, one strip, on the left will butt up to the strip on the right.
 10. Fold the right strip over the left one until you get the above. The edges should stick out by 1/4". I am measuring mine to make sure.
 11. Now sew the two strips together with a 1/4" seam allowance. I use a scrap piece of fabric to take the ends of the thread so that they don't bunch up on my project.
 12. Once the strips are all sewn together; you will want to press the seams OPEN. Less bulk this way.
  13. Clip your bunny ears.
 14. The next step is to iron the wrong sides together on your entire strip. I recently started using starch and I found it to be messy in the process but my, oh, my does it keep my binding strip crisp! It makes it so much easier for me to sew onto the quilt and then to the back of the quilt. See if you like to use it. However, get a second iron and don't use your expensive regular one.
 15. On the left side of this strip you can see where I ironed it originally and then on the right; you can see that I used starch. For me, it makes a huge difference! All the residue washes out when you are done so don't worry.
 Here is my finished and ready to be used binding.
16. I missed a photo of this step. You want to take one end of your binding. The one you will start with and iron in (on that 45* diagonal) 1/4". Press it really well and cut your bunny ears. Now we are ready to proceed.
 17. Now, find the place where you want to start your binding. NEVER on the edge of the quilt. I usually start it 1/4 way down from either end. You could lay out the quilt and take the binding and lay it around to make sure where your joins fall and if you have enough or not. I don't bother, personally.
 18. Make sure your kitty is nowhere near danger and proceed to lay down the prepared edge of your binding.
 19. Lay down your binding and open it up. Start sewing at the edge and make sure you backstitch by 3 stitches. Measure out about 3" and place a pin like above. Sew 1/4" and stop at the pin. Backstitch. Pull out the binding and clip your threads.
 20. Go back to the top or beginning and close your binding. Start sewing at the point where the pin was or 3" down. Backstitch. Now, proceed to sew around the quilt until the corner. You have now created your pocket.
21. Just before you reach the end, measure out where 1/4" is from the corner and mark with a pin. Sew until that pin and backstitch 3 stitches.
 Yep, you guessed it, another visual!
 22. Pull out your binding and don't cut the threads. Well, you can if you want to. This is the first time I did not and I really liked it.
 23. Turn 1/4 so that it looks like my picture above. Sometimes technical terms escape me.
 24. Fold up your binding that is hanging on your right side and then fold it back down on itself.
 Like this.
 25. Move the threads out of your way. I held on to mine so that the threads would not get tangled underneath. Begin sewing from the edge and backstitch 3 stitches. Start sewing the length of your quilt until the next corner.
 I think this picture is just to show Uki in the background.
 26. Ok. Now we are at the end. Normally, if I had cut the strip ends the opposite way than I demonstrated, you would now see a pocket. Because I did it this way, the pocket is inside. Enlarge this photo and you will see the edge of the pocket at the white pin or where the foot is. The reason for the pins is to help me fit the end in nicely. Proceed to sew this section down.

*****SEE THE LEFT OVER STRIP?? WONDERFUL! NO WASTAGE!!*****
 28. Now you can go and cut the extra threads.
 29. Now, your binding is done and sewn on to your quilt. Now it is time to sew the binding down. I made a quilter's knot and ran it through inside the 1/4" seam allowance. Place your needle where you want to start sewing.
 30. Take your first stitch.
 Here is a visual for you on how my binding looks.
31. Once at the corner, you want to make a beautiful miter. I sewed to the 1/4".

32. I then fold the left side fabric over to meet in the corner and take a stitch.
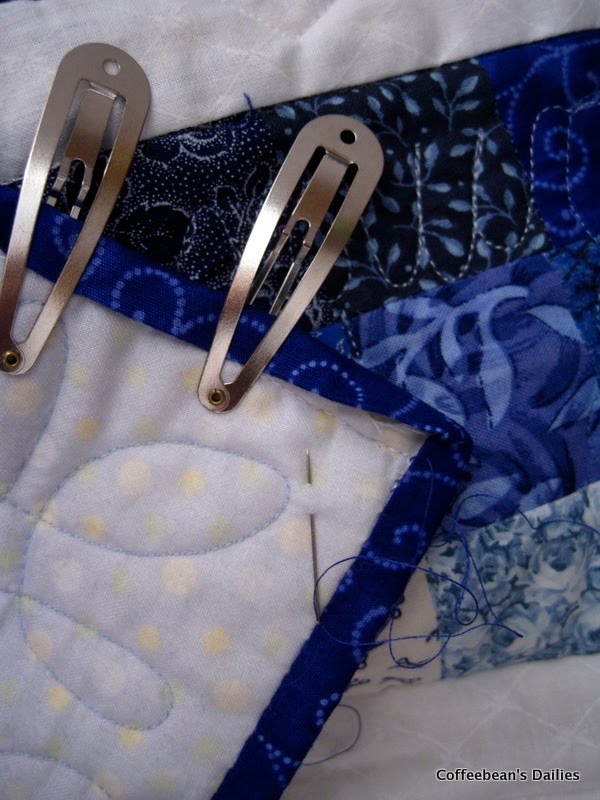
33. I like to use Binding Clips at this stage. It helps me to control the binding.

34. Take a stitch across the join like above. I take 3 stitches.

35. The 4th time back, I go into the white or backing fabric of the quilt and pick up some threads and come back up into the new side of the binding.
 Keep sewing all the miters like this and keep sewing the binding until done.
 Keep sewing all the miters like this and keep sewing the binding until done.
I have a very nice thimble but I just could not get used to it. So, I improvised and double taped my finger! It worked a charm!!
My quilt is in the washing machine right now so I will post the completed quilt tomorrow!
Thanks for your patience. I hope to hear what you all think about my first tutorial and more importantly, I hope it helps someone!!


.jpg)

1 comment:
great post, thanks Alia
Post a Comment